Showing posts with label Recipe. Show all posts

Thursday, July 14, 2011

Recipe: Apam polkadot

ye, semalam jugak aku buat...
sampai rumah kul 6 lebih terus singsing lengan baju hahah..

Bahan2 nye:
Photobucket

3 biji telur (sejuk drpd peti ais)
275g tepung
220g castor sugar
3tsp baking powder
1tsp ovalette
150ml fresh milk
pewarna (ikut suka masing2)
filling (eg choc chip, jem, peanut butter etc -- ku guna choc chip je)


ohh memang la ramai pembantu yang eksaited nak tolong, seb baik chef kecik tu tido!

memula mix telur + ovalette + gula..
Photobucket


sampai putih ye... (menurut blog inilah, kalau tak tgk sure aku pukul ala kadar je :P).. sampai floofy..
Photobucket

pastu masuk tepung (yang dah diayak bersama baking powder) berselang seli dengan susu..
pukul sampai sebati, tapi katanya, jangan lama sangat..

kemudian, boh pewarna and masukkan dalam piping bag..
Photobucket
ohh aku sangat ambitious and tamak semua kaler nak buat.. udah nye, tatau macamane mau handle piping bag yang banyak2 tu.. tenggek2 kan gitu, meleleh kuar kat muncung aiyoo... lain kali buat 2-3 kaler je lah!

boh dalam papercup yang dibubuh dalam bekas keras, kalau tak nnt papercup tu 'kembang'.. aku pakai pengukus ikea yang comel tu je... rase kalau cukup bekas mungkin muat dalam 10 bekas... tp semalam beli bekas tu 7 biji je iskk 70sen sebijik tau..
nnt nak beli lagi lah, atau beli papercup besar so, cepat sket hahha... mengelat!!
pastu boh la adunan tu mengikut kreativiti masing2... memula buat, ladybird ku tak jadik T_T
Photobucket

Photobucket
lepas 2-3x try, baru macam comel sikit... (comel takkk???)

Photobucket
ni pulak, hasil SIL and Fatini... sume kaler dia bedal masuk dalam papercup tu...

ni hasil nya...
PERINGATAN: lepas ni, gambar2 yang melambak.. jangan mare... they are sooooo colourful... i cant resist looking and admiring them... put aside the quantity of colouring auww...

Photobucket

Photobucket

Photobucket

Photobucket

Photobucket
here are my ladybirds.... i heart them sooo much!!!

Photobucket

Photobucket

Photobucket

Photobucket

Haziq suka sangat... Faris pon, mulut penuh lagi dah "nak agi.."... bila hulur satu pinggan, rambang mata nak pilih pulak... Fatini, memula je eksaited, pas sebijik dua, dia tak heran... hmm mmg ngikut daddy.. bukan suka sgt bende2 gini... mummy gak yang tukang makan huhu... pipi pon jadik cam apom ni huhuh...


soooo... kalau aku boleh buat... korang pon boleh buat.... dia mudah, (leceh sikit je, tp lama2 tu jadik senang).. enak, very attractive colours.. or kalau tanak kaler teghang sangat, just boh sikiiiiit je the colouring, leh dapat pastel colours... and bleh ikut kreativiti masing2 nak boh corak apa... tp corak ladybird tu mmg pojaan hatiku!!!... rase cam nak simpan frame je hahahha...

okay... selamat mencuba!!


Wednesday, July 13, 2011

apam polkadots... saya mauuuu...

minggu sebelum sebelum ni, Nina dah meracun ku dengan apam polkadot dia... tp aku buat donno...

last weekend pulak, Pah dok tayang apam polkadot dia yang berkawah.. berkawah2 pon, masih nampak sodapp...

semalam pulak, aku takde keje, aku gi lah gugel "apam polkadot"... ohh banyak ropanya... ramai ropanya yang membuat apam polkadot ni... ala-ala nationwide la jugak... ada je blog2 yang tepek gamba apam polkadot depa, samada buat sendiri mau pon beli....

aku gugel plak 'google image"... humang aiiii meleleh acik... ohh kalau ada baby dalam poyot, sure leh bagik alasan nak sekarang jugak hahahha.. (macam laki aku nak layan ceihhh)

so, terpikir nak carik utk bawak gi rumah mak sabtu ni.. mintak kawan2 rekomen..
at last aku order kat Arneza, member kepada member aku... sbb dia dok kat Jalan Kuching, senang sket nak gi amik otw gi rumah mak nanti...

dan meroyan aku tak abis di situ, kat cafe opistal pagi ni, aku tengok ada gak dia jual apam polkadot yang comey lote itu... 4 biji singgit you!!!

comel kannnn????
Photobucket

TAPIIIII....
Photobucket >>> padat... tak gebus... owhh kiciwa!!!


dannnn... dengan semangat yang mana datang ntah... aku ajak Umi & Dian & kak Fizah pegi kedai bahan2 kek kat Taman Midah... sebab tak saba mau tunggu Sabtu....
Photobucket
apa motif ntah amik gamba ni... saje sebagai bukti ni kedai jual bahan kek okeh hahahah

so... aku beli bahan2 nya....
Photobucket
antaranye, ovalette, tepung, pewarna... dan bekas comel2.. carik bekas lompang takde pulak.. so, taram je lah bekas tu.. nnt boh papercup dalam tu..

resipi aku cilok sini ada step-by-step lagi.. -- lagipon sama je, mana2 blog/site pon resipi ni... macam senang gile...


so, petang/malam ni aku nak buat... hasil dia nanti aku tunjuk okehhhh.....

Saturday, July 9, 2011

Recipe: Homemade Pizza

Hari ni lunch pizza je..
mmg dah lama plan nak masak... Bebudak ni pon dah lama suruh masak...
guna resepi Chef Sazali yang Datin bagik..

kali ni, sauce pon buat sendiri from scratch woohoo...

Dough:
900g high protein flour
100g butter
2 eggs
35g instant yeast
50g sugar
10g salt
10g bread improver
10g bread softener

Sauce:
250g tomato paste
1tbsp oregano
1tbsp mixed herbs
1tsp white pepper
1tsp black pepper
150g butter
1tsp salt
1tsp sugar
30g mozzarella cheese

>> untuk sos, takde la tiru bulat2.. mana bahan2 yang ada je.. tak sukat betul2 pon..

methods:
mixed all the ingredients, uli sampai jadik sebola doh macam ni
Photobucket

biarkan doh berehat 15-20 mins

lepas tu, bahagi2 kan doh kepada bebola kecil
Photobucket
untuk makluman, aku buat 1/2 adunan je, so dapat la 8 bijik bola kecik lepas dah mengembang doh ni..

uli setiap bebola, menjadi leper
Photobucket ohh i mmg ramai helperssss...


lepas dilenyek rolled, satu bola kecik, dapat la pizza yang kecik tu, 1 1/2 bola kecik dapat pizza pansize tu.. tapi buat nipis2 sbb kalau tak dia mengembang, tebal sangat tak best
Photobucket

masak dalam oven sekejap 8-10mins
Photobucket
err.. jangan fanic bila dia mengembung macam tu..

sambil2 tu boleh la sediakan perkakas2 nak tabur atas pizza mengikut kesukaan dan kemampuan masing2..
Photobucket

dah masak sket, keluarkan and kemudian sapukan sos..
Photobucket

Photobucket semua pon nak buat sendiri

Photobucket faris pon... belasah je lah labu...

Photobucket
pastu taburlah apa toppings yang disukai and last sekali tabur cheese... ohh bebudak ni sangat seronok sbb dapat masak pizza sendiri...

kemudian masukkan balik dalam oven sampai cheese cair
Photobucket
dah masak boleh lah makan...

bebudak comots 3 orang ni, tengok dah masak, terus dok kat meja ngadap pizza panas tu, siap baca doa... uhuhu.. mummy masih sibuk masak another batch of pizza dgn nak buat frostings red velvet cake... tp sebab sume kebuluran, makan jelah anak2 ku...

so... sume gumbira... tp sekeping kecik tu pon, abis separuh je.. tatau la kenyang makan apa pagi tadi.. takpe2.. janji makan...

so, bleh la cuba buat pizza sendiri kat rumah ye...
cumaaaa..... aku hari sambil masak pizza sambil buat RV cake... fuhhh kalau takde maid, harus pengsan aku mengemas dapur...
tapi penat2 pon, yang penting dapat spend time dgn family... semua dok dapur (menyemak la jugak mata.. tapi takpe lah... sekali sekala kan...)


Recipe: Red Velvet cake

hari ni hari BERSIH? ntah la.. denga roadblock sana sini, so malas nak keluar rumah. So okay jugak memasak2 dan berehat2 di rumah.
Dari 2 hari lepas DH mintak masak pizza.. ok lah sbb lama jugak tak masak.. dulu masak pizza Faris lom ada lagi hahah.. dua tahun lebih yang lampau tu..

pagi ni, DH nak gi opistal, dia paksa aku ikut sbb nak beli bahan2 nak masak pizza.. aku pon pasrah la, kalau ikut nak je melingkar atas katil lagi huhuh..

tp ada gak hikmah sbb resepi pizza tu mmg tertinggal kat opistal.
dah alang2 nak gi kedai bahan2 kek, decide la nak masak Red Velvet cake.. now sana sini sibuk red velvet (RV).. aku plak dah cuba 2x, last sekali dari Ninazcakes.. sedappp...

so teringat resepi yang Pah share from JoyofBaking.

Ni resepi dari JoyofBaking:

Red Velvet Cake:
2 1/2 cups (250 grams) sifted cake flour
1/2 teaspoon salt
2 tablespoons (15 grams) regular or Dutch-processed cocoa powder
1/2 cup (113 grams) unsalted butter, at room temperature
1 1/2 cups (300 grams) granulated white sugar
2 large eggs
1 teaspoon pure vanilla extract
1 cup (240 ml) buttermilk -- ni aku buat guna 240mL milk + 1tbsp distilled vinegar (let it stand for 5-10mins)
2 tablespoons liquid red food coloring
1 teaspoon white distilled vinegar
1 teaspoon baking soda


Cream Cheese Frosting:

227 grams cream cheese, room temperature
227 grams tub of Mascarpone cheese, room temperature
1 teaspoon pure vanilla extract
1 cup (115 grams) confectioners' (icing or powdered) sugar, sifted
1 1/2 (360 ml) cups cold heavy whipping cream (double cream) (35-40% butterfat)

----
resepi Cheese Frosting tu guna mascarpone cheese.. humang aiii mahal gila mascarpone cheese tu, so Pah sms resepi Nina masa aku kat Tesco tadi.. ni resepi Nina, senang sikit:

250g cream cheese
35g butter
110g icing sugar
1tsp vanilla essence

Methods:

Red Velvet Cake:
Preheat oven to 350 degrees F (175 degrees C) and place rack in center of oven. Butter two - 9 inch (23 cm) round cake pans and line the bottoms of the pans with parchment paper. Set aside. -- aku ada satu je acuan, so just buat satu and kerat dua..

In a mixing bowl sift together the flour, salt, and cocoa powder. Set aside.

In bowl of your electric mixer, or with a hand mixer, beat the butter until soft (about 1-2 minutes).
Photobucket

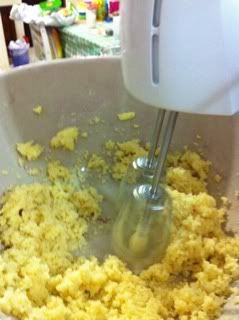
Add the sugar and beat until light and fluffy (about 2-3 minutes). Add the eggs, one at a time, beating well after each addition. Scrape down the sides of the bowl. Add the vanilla extract and beat until combined.


In a measuring cup whisk the buttermilk with the red food coloring. With the mixer on low speed, alternately add the flour mixture and buttermilk to the butter mixture, in three additions, beginning and ending with the flour.

Photobucket

Photobucket 
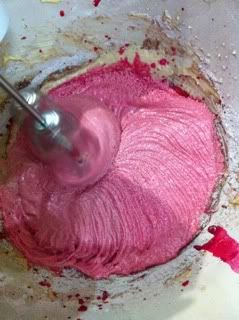
memula nampak pink, bila dah add semua buttermilk+colouring, baru lawa sket colour merah tu hihih..

In a small cup combine the vinegar and baking soda. Allow the mixture to fizz and then quickly fold into the cake batter.

Photobucket

(Working quickly, divide the batter evenly between the two prepared pans and smooth the tops with an offset spatula or the back of a spoon.)


Bake in the preheated oven for approximately 25 - 30 minutes, or until a toothpick inserted in the center of the cakes comes out clean. Cool the cakes in their pans on a wire rack for 10 minutes. Place a wire rack on top of the cake pan and invert, lifting off the pan.
Photobucket 
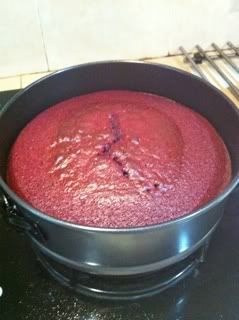
dah masakkk... tunggu sejuk

(Once the cakes have completely cooled, wrap in plastic and place the cake layers in the refrigerator for at least an hour (or overnight). (This is done to make filling and frosting the cakes easier.)) >>> of cos la tak buat step yang ni... hahah

[Read more: http://www.joyofbaking.com/RedVelvetCake.html#ixzz1Rao14wJ3]

Photobucket
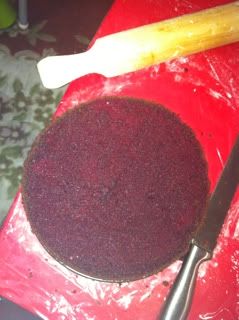
kek yang dikerat dua.. tapi sebab tengah still panas, agak bergigi-gigi la potongan rentas kek tuh... belasah je lah hahha

Photobucket 
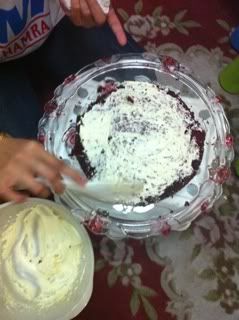
sapu cheese tp sebab potongan tak lawa.. bercampur2 dgn 'serbuk2' kek hasil potongan... boleh la untuk amatur kannn.. (sure Nina gelakkan kek aku!!)

Photobucket 
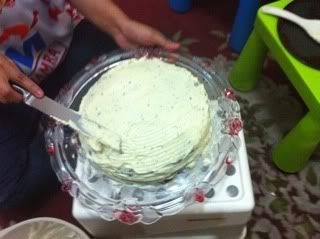
time untuk mekap... woohoo...

Photobucket
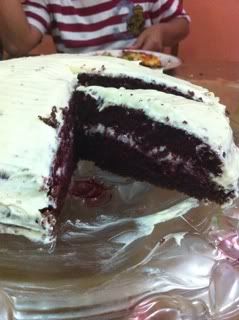
tadaaaa... ni lah hasilnye.. sib baik boleh mekap2 luar tu... tapi patutnye kat tgh tu boh banyak sikit frostings...

Photobucket nyumm nyumm...

the verdict???

aku rase sedap je.. hahah dah sendiri buat harus la puji sendiri..
gula aku kurangkan dari 300g ke 250g, rase ok je kalau suka kurang manis. Tambah plak frostings tu dah manis..
cuma aku rasa macam kurang moist... apa sebab ekk?? ada apa yang kurang? Atau terlebih masak?? sbb lepas 30min, tgh mcm still melekat bila cucuk lidi.. so, aku extend lagi 10minit, sbb tu ke ekk??
lagi satu sape leh tolong jawab, utk masak kek, oven tu pakai setting mana ye? panas atas bawah dgn fan or without fan?? (aiyoo malu nye, ada oven tapi tatau pakai hahahha)

all in all.. clap clap clap!! percubaan pertama RV cake, not bad huhhh... janji kek tak bantat... woohoo.. :happy dance:

so, sape nak cuba silakan...
sini Pah ada bagik modified recipe, bleh la cuba mana2 resipi yang nak...

SELAMAT MEMASAK...


Monday, June 27, 2011

Recipe: Parmesan cheese mushroom dip

I got this recipe from my ex-lecturer.. Easy and yummy..

Ingredients:

1 can button mushroom (chopped)
2 cloves garlic (chopped)
475g mayonnaise
200g parmesan cheese


Methods:

1) mix all ingredients in a heatproof bowl
Photobucket

Photobucket

2) bake in the preheated oven (150'C) for 30-40 mins
Photobucket

3) serve with toasted baguette
Photobucket
** i have no baguette, so i just spread on wholemeal bread... equally yummeh okey...**


"Selama mencuba"


LinkWithin

Related Posts with Thumbnails